 NAS
Install the NASlab agent: step by step
Unraid, Synology, TrueNAS SCALE, Linux · about 5 minutes
The agent is a small container on your NAS or server. It only reads and changes nothing. It gives the app history around the clock. You need about 5 minutes, a computer on the same home network and the NASlab app.
The pictures are schematic drawings (simplified, with demo names), not photos of the real screens. Menus may be named or placed slightly differently depending on your version.
Short version with all commands: Install the agent
Unraid
Container template from Apps
Install
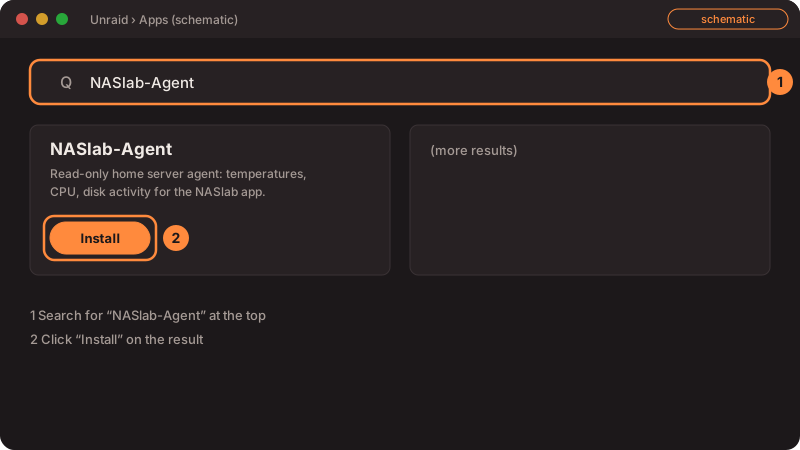
Not in the catalog yet? Use step 4 (add the template repository).
- Open Unraid in your browser and click “Apps” at the top.
- Type “NASlab-Agent” into the search box.
- Click “Install” on the result.
- Not found? Unraid › Docker › bottom “Template repositories”: paste
https://github.com/Tuxxler/unraid-templates› Save. Then Docker › Add Container › template “NASlab-Agent”.
Check the paths
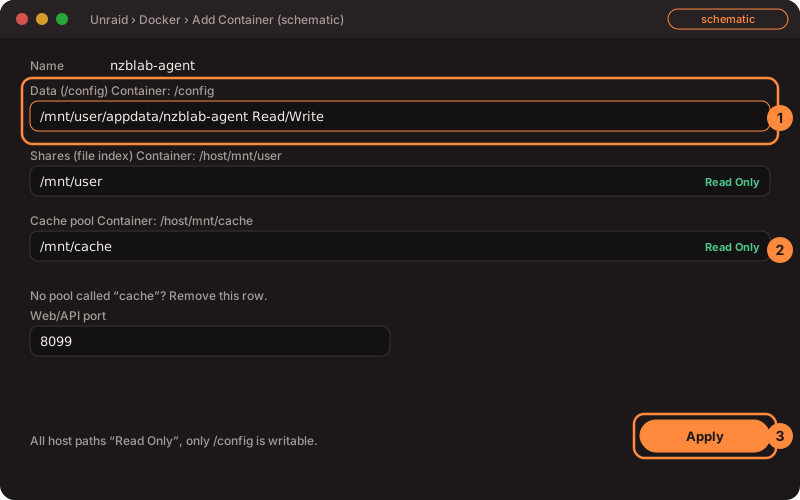
- Keep the path “Data (/config)” as is:
/mnt/user/appdata/nzblab-agent, Read/Write. The agent keeps token and history here. Without it you get a new token after every update. - All other paths stay “Read Only”.
- No pool named “cache”? Remove the “Cache pool” row.
- Click “Apply” at the bottom. Unraid downloads the image and starts the agent.
Get the token
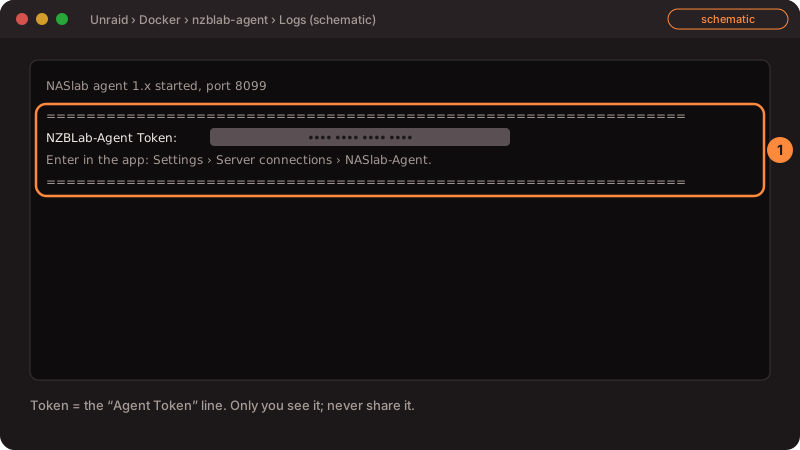
- Open Unraid › Docker.
- Click the icon of “nzblab-agent” › “Logs”.
- Copy the line “NZBLab-Agent Token”. Later it is also in the file
appdata/nzblab-agent/token.txt.
In the app your server type is “Unraid”. The agent sees home network devices only with network type “Host” (optional).
Synology (DSM 7.2 or newer)
Container Manager, project
Install
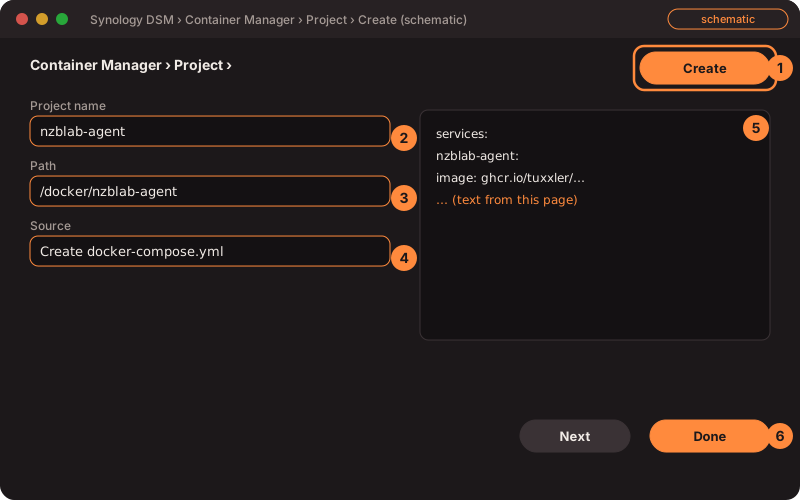
- Install “Container Manager” from Package Center (if missing).
- Open “File Station”. In the folder “docker” create a new folder
nzblab-agent. - “Container Manager” › “Project” › “Create”.
- Enter the project name
nzblab-agent. - Choose the path
/docker/nzblab-agent. - Choose source “Create docker-compose.yml” and paste the text below.
- “Next” › “Next” › “Done”. The container starts by itself.
services:
  nzblab-agent:
    image: ghcr.io/tuxxler/nzblab-agent:latest
    container_name: nzblab-agent
    restart: unless-stopped
    ports:
      - "8099:8099"
    environment:
      # TZ: Europe/Zurich   # example: only set if times in the log are wrong; use your own time zone
      PUID: "1026"   # your DSM user ID (SSH: id), 1026 is only an example
      PGID: "100"
      FILES_EXCLUDE: "@*,#*,docker"
      CACHE_ROOTS: ""
    volumes:
      - /volume1/docker/nzblab-agent:/config
      - /sys:/host/sys:ro
      - /proc:/host/proc:ro
      - /volume1:/host/mnt/user:ro
    read_only: true
    tmpfs:
      - /tmp
    cap_drop:
      - ALL
    cap_add:
      - CHOWN
      - DAC_OVERRIDE
      - FOWNER
      - SETUID
      - SETGID
    security_opt:
      - no-new-privileges:true
    mem_limit: 512m
    cpus: 1.0
Get the token
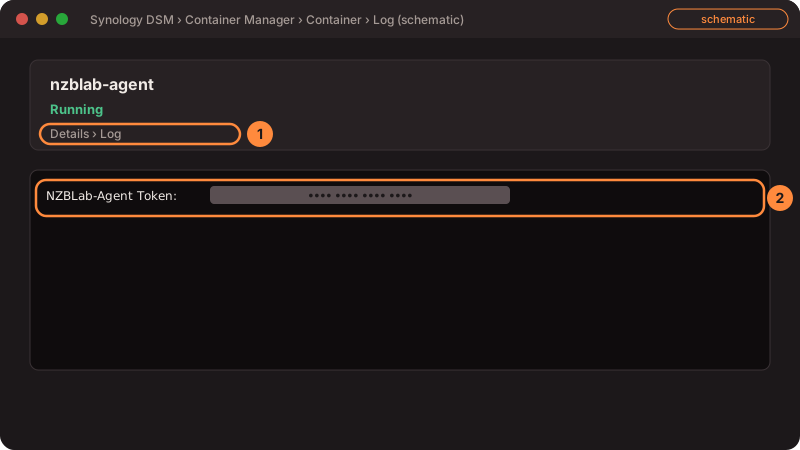
- “Container Manager” › “Container” › “nzblab-agent” › “Details”.
- Open the “Log” tab.
- Copy the line “NZBLab-Agent Token”. Later it is in
docker/nzblab-agent/token.txt.
If your storage is not “volume1”, replace /volume1 in the text with your name. In PUID and PGID, 1026 and 100 are only an example: enter the numbers of your DSM user (via SSH: id); the agent does not run as root. So far only tested with Synology DSM 7.2 in a virtual machine, not on real Synology hardware. The menu names above were not re-checked on a running DSM.
TrueNAS SCALE (24.10 or newer)
Install from a YAML text
The agent runs on 24.10 or newer. The app itself only talks to the TrueNAS interface from version 25.04.
Install
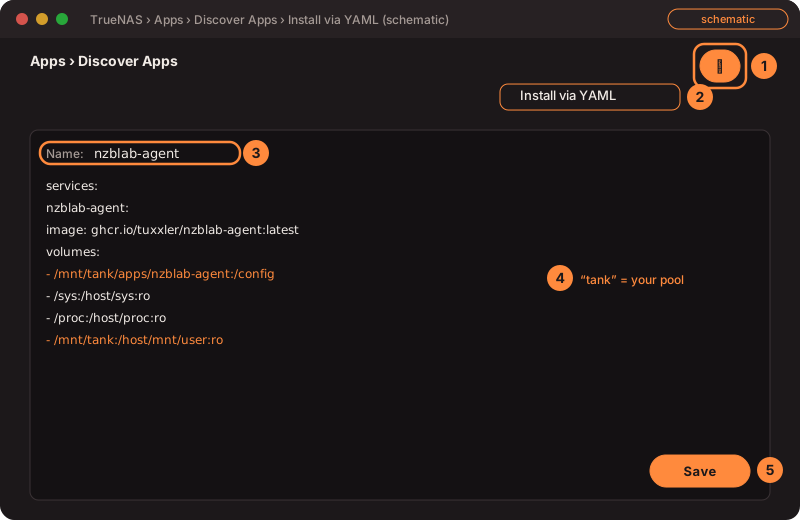
- Open TrueNAS in your browser › “Apps” › “Discover Apps”.
- Click “⋮” at the top right › “Install via YAML”.
- Enter
nzblab-agentas the name. - Paste the text below. Replace every
tankwith the name of your pool. - Click “Save”. TrueNAS downloads the image and starts the agent.
services:
  nzblab-agent:
    image: ghcr.io/tuxxler/nzblab-agent:latest
    container_name: nzblab-agent
    restart: unless-stopped
    ports:
      - "8099:8099"
    environment:
      # TZ: Europe/Zurich   # example: only set if times in the log are wrong; use your own time zone
      PUID: "568"
      PGID: "568"
      FILES_EXCLUDE: "ix-applications,.ix-apps,.system,apps"
      CACHE_ROOTS: ""
    volumes:
      - /mnt/tank/apps/nzblab-agent:/config
      - /sys:/host/sys:ro
      - /proc:/host/proc:ro
      - /mnt/tank:/host/mnt/user:ro
    read_only: true
    tmpfs:
      - /tmp
    cap_drop:
      - ALL
    cap_add:
      - CHOWN
      - DAC_OVERRIDE
      - FOWNER
      - SETUID
      - SETGID
    security_opt:
      - no-new-privileges:true
    mem_limit: 512m
    cpus: 1.0
Get the token
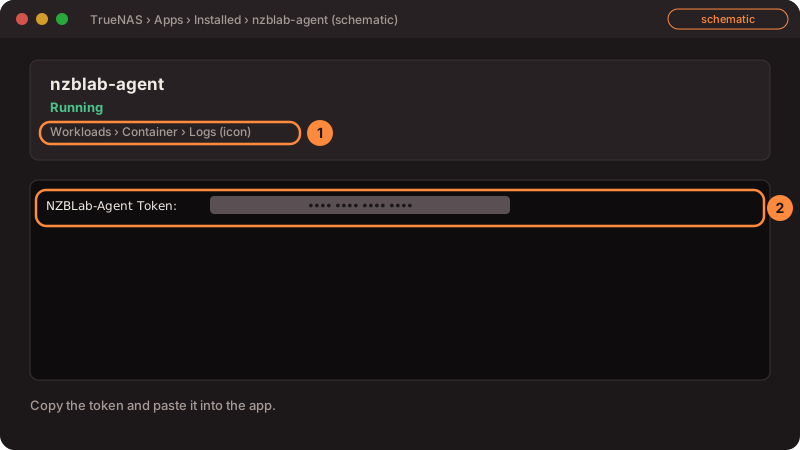
- “Apps” › “Installed” › “nzblab-agent”.
- Under “Workloads” click the log icon of the container.
- Copy the line “NZBLab-Agent Token”. Later it is in
apps/nzblab-agent/token.txtin your pool.
Tip: first create a folder apps/nzblab-agent under Datasets, owned by the user “apps” (568). In the app your server type is “TrueNAS”.
Linux (Debian, Ubuntu …) · Beta
With Docker in the terminal
Install
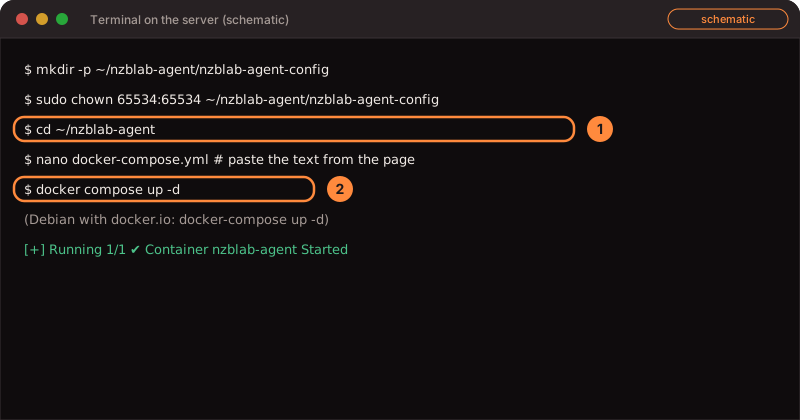
- Open a terminal on the server (or connect by SSH).
- Create the folder:
mkdir -p ~/nzblab-agent/nzblab-agent-config - Give the folder to the agent:
sudo chown 65534:65534 ~/nzblab-agent/nzblab-agent-config - Change into the folder:
cd ~/nzblab-agent - Create the file:
nano docker-compose.yml, paste the text below, save (Ctrl+O, Enter, Ctrl+X). - Start it:
docker compose up -d. On Debian with the “docker.io” package the command isdocker-compose up -d(with a hyphen).
services:
  nzblab-agent:
    image: ghcr.io/tuxxler/nzblab-agent:latest
    container_name: nzblab-agent
    restart: unless-stopped
    network_mode: host
    user: "65534:65534"
    environment:
      # TZ: Europe/Zurich   # example: only set if times in the log are wrong; use your own time zone
      FILES_ROOT: "/host/fs"
      CACHE_ROOTS: ""
    volumes:
      - ./nzblab-agent-config:/config
      - /sys:/host/sys:ro
      - /proc:/host/proc:ro
      - /etc/os-release:/host/os-release:ro
      - /srv:/host/fs/data:ro
    read_only: true
    tmpfs:
      - /tmp
    cap_drop:
      - ALL
    security_opt:
      - no-new-privileges:true
    mem_limit: 512m
    cpus: 1.0
Get the token
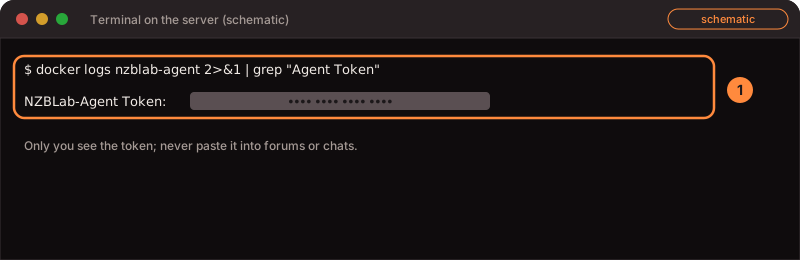
- Type in the terminal:
docker logs nzblab-agent 2>&1 | grep "Agent Token" - Copy the token. Later it is in
nzblab-agent-config/token.txt.
Beta: tested only with test data and a Debian 13 test machine. In the app choose server type “Linux (Beta)”. In the text change the /srv line to your data folder; never mount the whole system (/). Never expose port 8099 to the internet.
Connect to the app
On first start the agent writes a secret token to its log once. The app uses it to connect. Never share it.
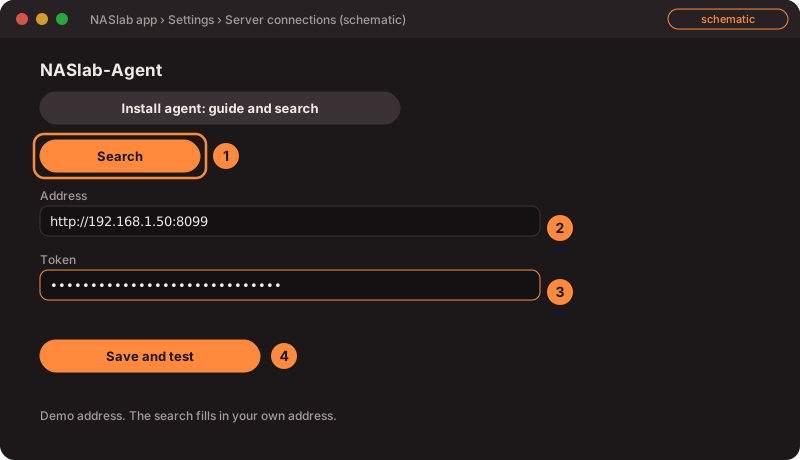
- Put your phone on the same home network as the NAS (or use a VPN).
- App: Settings › Server connections › NASlab-Agent.
- Tap “Search”. The app finds the agent on port 8099 and fills in the address.
- Paste the token.
- Tap “Save and test”. Green means connected.
Set up within 30 minutes: the agent hands out the keys of your services only in the first 30 minutes after it starts and only over HTTPS (address https://<nas-address>:8099). Connect the app within that time; otherwise restart the container. Once keys were handed out, a restart no longer opens the window (from agent 1.20.1): create an empty file keys-unlock in appdata/nzblab-agent instead (open for 10 minutes). If you open the address in a browser, it warns once because the agent uses its own certificate: compare the fingerprint with the line in the container log.
Still stuck? Questions and answers are at the bottom of Install the agent, otherwise Help and contact.